How to Photograph Jewellery for Online Listings
A phone-and-window guide to jewellery photos for UK sellers: diffuse the light, control reflections on metal and sparkle on stones, use macro and focus lock, fix white balance, follow a shot list for rings, earrings, necklaces and bracelets, and edit without misleading buyers.
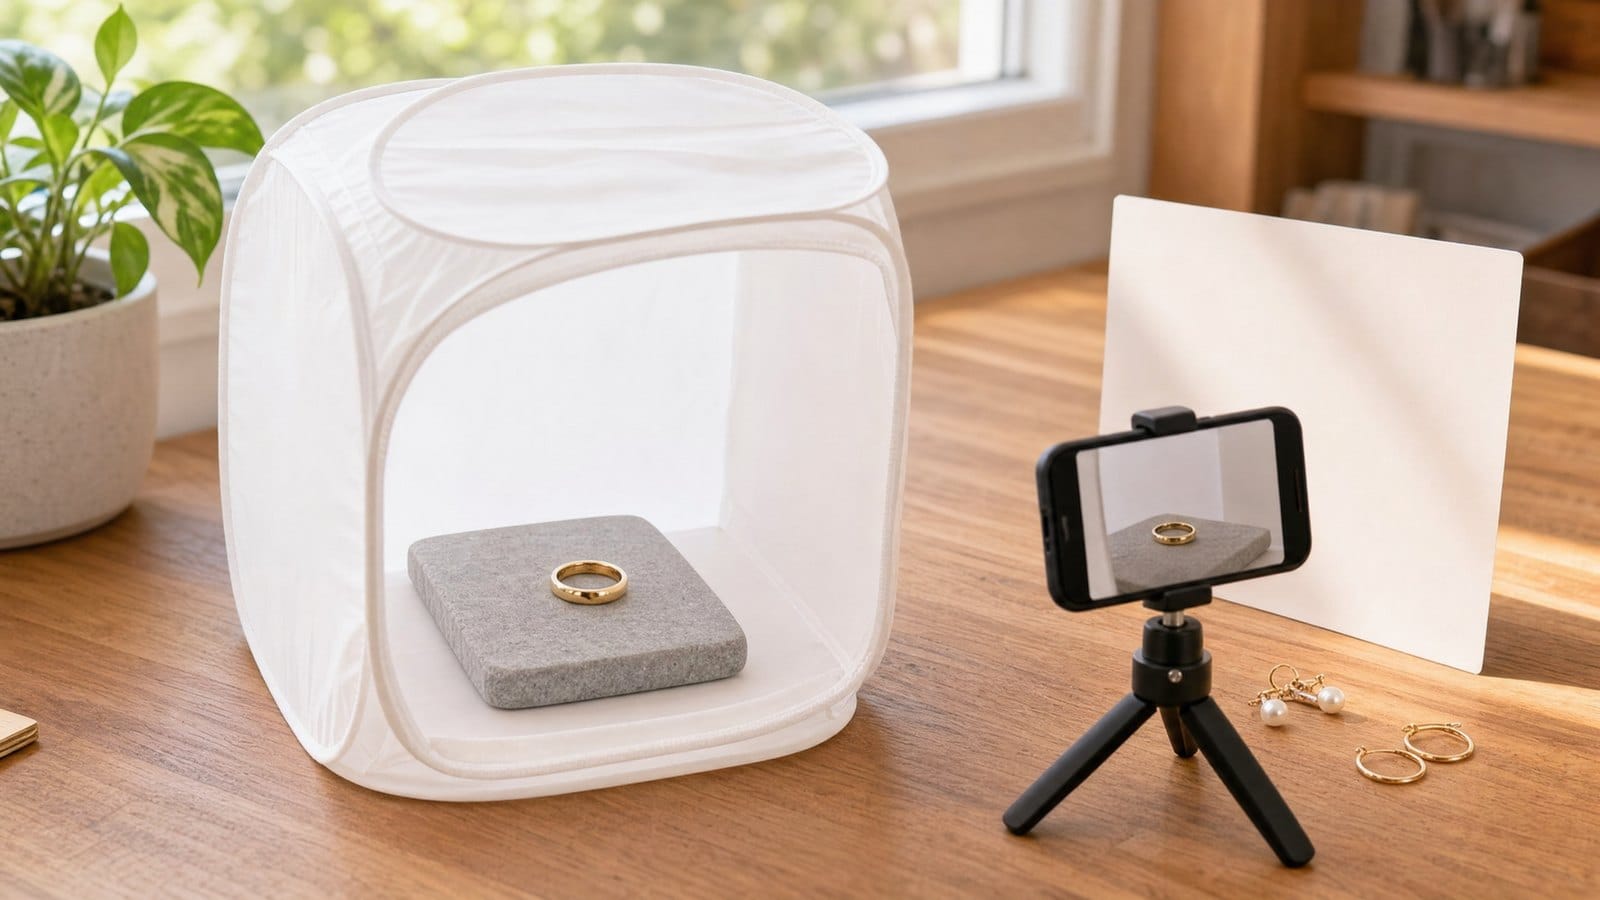
To photograph jewellery for an online listing with a phone, put the piece by a window out of direct sun, soften the light with tracing paper, switch off the room lights and the flash, and shoot on a plain background with the phone resting on something steady. Then take the same set of shots for every item, including the hallmark and a scale photo. For metal descriptions, measurements and returns, see the guide to selling jewellery online in the UK; for what the marks mean, see hallmarking rules for selling jewellery online.
A small-budget kit list
- Your phone, lens wiped clean, and a window with daylight but no direct sun on the table.
- Tracing paper or vellum to diffuse the light, and white and black card for reflectors and backgrounds.
- A small tripod or a stack of books, plus a wireless shutter release or the self-timer.
- A jewellery cloth, cotton gloves, a millimetre ruler, a 1p coin and putty to stand rings up.
Step 1: Clean every piece
Close-ups show fingerprints and dust. GIA's tips for photographing jewellery with a phone are to wipe each piece with a soft jewellery cloth before shooting and after every handling, and to use gloves or tweezers. If a piece needs more, warm soapy water is GIA's gentle option. Keep pearls, amber, coral, emeralds, opals that may be oiled or filled, and heat-sensitive stones such as tanzanite and moonstone out of an ultrasonic cleaner, as GIA's guide to ultrasonic cleaners explains.
Step 2: Set up soft light from one source
- Put a table beside the window, with direct sun kept off the piece.
- Turn off ceiling lights and lamps. GIA recommends one type of light rather than a mix of daylight, fluorescent and incandescent, which give different colour casts.
- Tape tracing paper over the window or hang it between window and piece. GIA explains that diffused light softens shadows and shows gem colour better than direct light, which can darken a transparent stone and leave hot spots on facets.
- Stand white cards on the far side to bounce light into the shadows.
- Turn the flash off (Apple's guide to iPhone camera tools shows where). It leaves bright spots on polished metal.
A light tent does the same job in a box. Cut windows in three sides of a cardboard box, cover them with tracing paper, and curve white card from the back wall to the floor so no corner shows. GIA also suggests curling the paper into a tube around the piece. Shoot at the same time of day each session, because window light changes.
Step 3: Choose a background and keep it
GIA's guide to lighting and positioning gems notes that a clean white surface keeps the image uncluttered, helps with correct colour balance and reflects light back onto the subject, which makes it the practical default for a first image. Dark backgrounds add contrast and suit light-toned pieces such as silver and diamonds. Use one background for the first image of every listing, and keep fabric, props and hands for later images.
Step 4: Control reflections and sparkle
Polished metal reflects the room, the phone and you. Diffused light, GIA notes, shows soft tonal gradients on it. Then:
- Surround the piece with white card so the metal reflects white, not the room.
- Shoot through a lens-sized hole in a sheet of white card, so the phone disappears from the reflection.
- Move the camera a few degrees at a time until dark reflections leave the top of the band.
For stones, GIA explains that gems usually look best viewed straight down through the table facet, so take one top-down shot of the main stone. For sparkle, let in a little direct light, such as a gap in the diffuser; GIA notes that combining direct and diffused light can add dispersion while still showing the stone's colour. Sparkle must come from light on the real stone, never from an editing effect.
Step 5: Get sharp close-ups
At close range a small movement blurs everything, so use the tripod and the remote or timer, and move closer rather than using digital zoom.
- iPhone macro. Apple's guide to macro photos says supported models switch to the Ultra Wide camera automatically when you get as close as 2 cm. If the image goes blurry, back up or tap .5x.
- Lock focus and exposure. On iPhone, tap the point you want sharp, then touch and hold until AE/AF Lock appears. Drag beside the focus area to brighten a piece darkened by a white background.
- Samsung Pro mode. Samsung's guide to Galaxy camera modes says Pro mode gives manual control of ISO, shutter speed, exposure, focus and white balance. Use manual focus for hallmark and setting close-ups.
- Clip-on lens. Without a macro mode, a clip-on macro lens lets a small piece fill the frame, as GIA's phone tips suggest. Check the frame edges are sharp and crop if not.
Step 6: Get the colour right
Under a warm lamp white gold can look yellow, and in blue shade silver can look grey. Three checks:
- Switch off filters. Apple notes a Photographic Style applies to every photo until you change it or close Camera, and choosing Original removes a filter.
- In Samsung Pro mode, fix the white balance. Samsung's Pro mode guide lists presets including Daylight, Cloudy and Tungsten, or a manual colour temperature.
- Put a white card in the first frame of each session. If it looks blue or yellow, correct the white balance until the card is neutral, then apply the same correction to the whole set.
The shot list for each type of piece
Keep the same order in every listing.
Rings
Three-quarter view standing in putty; top-down view of the main stone; side profile showing setting height; inside the shank for hallmark, maker's mark and engraving; underneath the setting; on a hand.
Earrings
The pair front on; one from the side to show depth; the back and fitting (post and butterfly, hook, lever or hinged hoop) with any hallmark; worn, or beside a ruler to show the drop.
Necklaces and pendants
Full length in a loose circle or on a neck form; pendant front and back; bail, clasp and the tag carrying the hallmark; a chain close-up showing the link type; worn, to show where the pendant falls.
Bracelets
Laid in a circle or on a stand; clasp open and closed, with any safety chain; link or stone detail; hallmark; worn on a wrist.
Scale shots: show the size, then state it
In a close-up, a small stud and a large one look alike, so every listing needs one image for scale: worn, beside a millimetre ruler with the zero mark in frame, or beside a 1p coin. The Royal Mint gives the one penny coin a diameter of 20.3 mm, so a caption such as "shown next to a 1p coin (20.3 mm)" gives a fixed reference. Photos support the measurements; they do not replace them, so put sizes in the description too.
Hallmark and detail shots
A readable hallmark is the photo that backs up your metal description.
- Clean the area, switch to macro and lock focus on the mark.
- Light it from a low angle at the side, so the stamped marks cast small shadows. Flat front light tends to fill them in.
- For second-hand pieces, photograph wear, scratches, a thin shank, repairs or a missing stone as clearly as the good points.
Edit without misrepresenting the piece
Editing is fine when it brings the photo closer to the real item: cropping, straightening, correcting white balance and exposure, and removing dust from the background. GIA's photographers say the same: edits should make the image accurately reflect the object. Removing scratches, inclusions or wear, changing a stone's colour or adding sparkle crosses the line.
For traders, section 226 of the Digital Markets, Competition and Consumers Act 2024 defines false or misleading information about a product as a misleading action, and says an overall presentation can deceive even if the information in it is true. A retouched photo is part of that presentation. GOV.UK's summary for businesses says misleading actions are banned when they are likely to change a consumer's decision, under rules in force since 6 April 2025, and the CMA's unfair commercial practices guidance confirms these rules replace the Consumer Protection from Unfair Trading Regulations 2008. Separately, section 11 of the Consumer Rights Act 2015 requires goods sold by description to match it. A simple test: held next to the piece on arrival, would the photo look different apart from the background?
Image size and file names
- Shoot at full resolution and export the first image square. Shopify's page on product media types says 2048 x 2048 px usually displays best for square images, within limits of 5000 x 5000 px or 25 megapixels and under 20 MB, with PNG and then JPEG as the best file types.
- Rename files before upload. Google's image SEO guidance asks for short, descriptive filenames, such as 9ct-yellow-gold-signet-ring-hallmark.jpg rather than IMG00023.JPG.
- Write alt text that describes the image, such as "9ct yellow gold signet ring, inside of band showing hallmark". Google warns against stuffing it with keywords.
Keep one style across your shop
On a shop or category page, buyers see first images side by side. Write a one-page style sheet and follow it every session: location and time of day, diffuser, first-image background, shot order per item type, camera distance and angle (mark phone and piece positions on the table with tape), crop ratio, white balance setting, and the hand or stand used for scale. When you change the set-up, reshoot the first image of older listings. For packaging, logo and the wider brand look, see the guide to starting an online jewellery business.
Where MC999 fits
MC999 is a UK online marketplace with no commission on sales; sellers pay a monthly fee based on the scale of their business. If you sell through a Shopify, BigCommerce or Shopline store, you connect it and buyers complete the purchase on your own website. Without a web shop, you can list items manually and arrange payment with the buyer directly. See how independent sellers present pieces in the Jewellery and Watches category. The first 300 approved UK Founding Sellers get the monthly fee free for 6 months: see how to become a Founding Seller.
FAQ
Can I use the supplier's photos instead of my own?
Supplier photos show the design, not the item the buyer receives. Use them only with the supplier's permission, add your own photo of the hallmark, and always photograph second-hand or handmade pieces yourself.
Do I need a ring light?
No. A ring light on a phone is direct light from the lens position, so it tends to appear as a bright circle in polished metal and stones. Diffused window light with white card reflectors gives softer reflections and truer stone colour.
Can I remove or replace the background?
Yes, as long as the piece itself is unchanged in colour, shape and condition. Removal tools can blur fine chains or clip off claws, so check the result at full size against the original.
Sources (checked 2 November 2026)
- GIA 4Cs: Jewellery and gem photography tips using a mobile phone or tablet
- GIA: How to photograph gems and jewellery, lighting, backgrounds and positioning
- GIA 4Cs: Ultrasonic cleaners for gems
- Apple Support: Take macro photos and videos with your iPhone camera
- Apple Support: Use iPhone camera tools (focus, AE/AF Lock, exposure, flash, filters and Photographic Styles)
- Samsung UK: Galaxy camera modes, Pro mode
- Samsung: Pro Mode on a Galaxy phone camera (white balance presets, manual focus)
- The Royal Mint: One penny coin specification (diameter 20.3 mm)
- Digital Markets, Competition and Consumers Act 2024, section 226 (misleading actions)
- GOV.UK (CMA): What businesses need to know about unfair commercial practices
- GOV.UK (CMA): Unfair commercial practices guidance, CMA207
- Consumer Rights Act 2015, section 11 (goods to be as described)
- Shopify Help Center: Product media types and image sizes
- Google Search Central: Image SEO best practices (file names, alt text)